All posts by admin

Why is My Spectrum Email Not Working Properly? (2022)

Millions of users are dependent on Spectrum Email because of its top-notch service. It is popular among people and used to communicate, manage contact, schedule meetings, and various other things. However, sometimes you see that your Spectrum email is not working properly. Or you are not able to receive or send anything. So, if you are also facing the same error, you can go through this guide and get your perfect solution.
Why is Spectrum email not working properly?
There could be various possibilities behind your Spectrum email not working properly; a few of them are:
Email Sign-in Issues
It is annoying when you try to log into your Spectrum email but fails; this usually happens when you have entered the wrong email address or you forget your Password.

Spectrum is not receiving/ sending an email

If you are not able to send or receive Spectrum emails, then the problem can be either from your side or the sender’s side, which you need to verify and fix.

Note: If your Spectrum email is not working properly, then the reason can be the presence of an incompatible browser as well.

Spectrum Email not working Properly on Chrome

Spectrum works perfectly with Chrome because the two are highly compatible, but if the user faces any issue accessing Spectrum email on Chrome, then there must be some malicious add-ons installed in your Google Chrome that are creating hindrances.

Password Reset Problems

At times, users face issues while logging into their Spectrum email because of an incorrect password, and when they try to reset it, they can’t even do so.

This usually happens when you have not changed your Spectrum email password for a long time and you have not even provided an alternate password recovery number or email.

Email Attachment Loading error

If you are facing an email attachment issue with your Spectrum email, then the reason can be the size of the attachment. Spectrum has set an upper limit on the size of the file you can send with an email; if you exceed that, then the receiver may not be able to open the image, creating Spectrum email issues for you.

Spectrum not responding properly

This issue happens due to less storage available in your device; another reason can be the presence of the security software in your device, which is creating a hindrance resulting in you facing Spectrum email problems.

Receiving unwanted email

If you are someone who usually provides your emails on different platforms on the Internet, your chances of getting spam are higher, which then leads to major Spectrum email Issues.
Note: Spectrum email has provided a filter for the Spam message, but you can still face this problem, as the spammers do find their way.

Related Post – SBCGlobal Email Not Working

How do I fix the Spectrum email not working Problem 2022?

Are you looking for a solution for your Spectrum Email issues? You can go through the below-mentioned steps to fix this.

Poor Internet Speed 

Slow internet speed is the most common reason behind Spectrum email not working properly; thus, you first need to verify your Internet speed. And if the error is in the Network, then restart your Router; this will help you in enhancing the speed.
However, if the problem is still consistent, you can contact your Network service provider and ask for help.

Look for the Spectrum Email Server Status

At times, the user may face issues with the Spectrum email because of the Spectrum server itself. However, this is not a frequent issue faced by Spectrum users. To know more about the server status, you can go to Google and search for why Spectrum email is not working today. Or you can even go to the official website of Down detector and learn about it.
Note: If the problem is in the Server, then you have to wait for it to get fixed.

Disable the Security Software

The presence of Antiviruses can be another reason that is creating hindrance for you while accessing Spectrum email. So, if this is the case, it is always advised to turn off your security software and check if the email starts working properly.
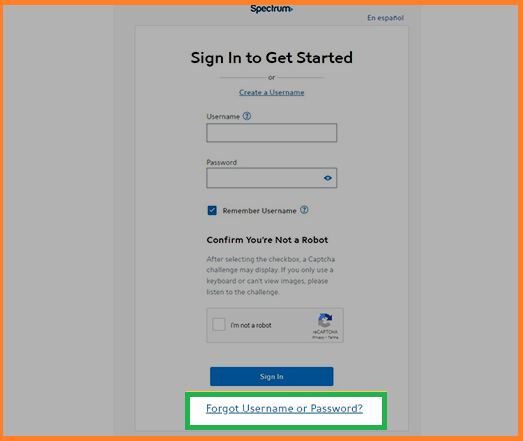
Reset Your Spectrum email and Password
If you are providing an incorrect login credential, then you will face the Spectrum email not working problem on your device. To eliminate that, always recheck your email id and Password before hitting the login button.

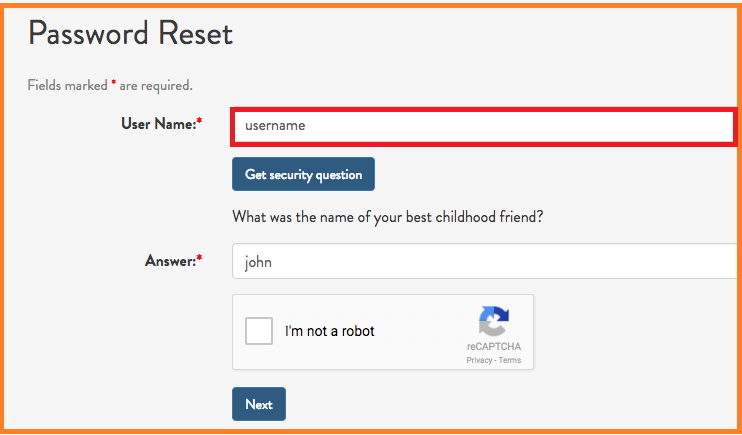
In case you forget your Spectrum email account password, then in such cases, you have to reset your password, and to do so, you can follow the given steps:

  • Open any Web Browser on your device
  • Now, reach the Spectrum email login page, then on that page, click on the “Forget password” option.

  • Then the” Confirm Your Account” page will open in front of you, where you have to choose any one between the given option:
  1. Username or Zip Code.
  2. Contact Info: Alternate Email Id or Phone Number linked with your Spectrum Email.
  3. Account info: Your Account Number along with the Security Code.
  4. After selecting an option according to your preference, enter the Required details
  5. Now tick the box to confirm that you are not a robot, and hit the Next button.


  1. Then, on the next page, you have to choose “Get Password” from the other options and hit the continue button.
  2. Now enter the Email address or phone number linked to your Charter account.
  3. Then you will receive a 6-digit code on that email or phone number.
  4. After that, you will reach the “Password reset page,” where you have to enter your New Password, re-confirm it, and then hit the Save Button.

By this, your Spectrum email account password will be changed.

Now that you know the steps to resolve Spectrum email not working issues, let’s learn how to fix this issue in some particular devices or apps.

Related Post – Why AOL Email Not Working On iPhone & How to Fix It

Steps to resolve Spectrum email not working on iPhone

To resolve the problem of Spectrum email not working properly on your iPhone, you have to remove and re-add your account on your device. To do so, follow the below-mentioned procedure.

Steps to remove Spectrum Email Account

  • Open “Settings,” then choose the “Mail” option and go to the “Accounts” tab.
  • Now, Select the email you want to delete, and delete it.
  • After that, you have to re-add your Spectrum email

To re-add that account, follow these steps:

  • To initiate the process, go to the Settings option.
  • Now, you have to click on “Mail, contacts, and calendars.”
  • Now click on “Add Account.”
  • Then hit on the Email service provider from the list available on the screen.

Note: You can choose Spectrum email as your service provider if it is available in the list, else you have to Click on Others.

  • Now, tap on the “Add Mail Account,” and click on the Next option
  • On the Next page, you need to provide all the login credentials, including Your Spectrum email, password, and description(if needed).
  • Now you have to choose IMAP or Pop settings.

In case you choose IMAP as the account type, then provide the rest settings of it like incoming mail server settings and the outgoing mail server settings.

  • Or if you have selected POP, then provide settings according to POP account type.
  • At last, hit on the Save button to finalize the process.

Note: It is always recommended to go with the IMAP option, as it is more flexible with Spectrum email.

By following this process, you can easily set Spectrum email on your iPhone.

Server information needed for Spectrum email settings on iPhone

MAP Settings 

  • IMAP Host: mobile.charter.net
  • IMAP Port: 993
  • Required SSL: Yes
  • IMAP Username: Your Full Email Address (name@domain.com)
  • IMAP Password: Your Spectrum Mail Account Password.
  • POP Settings
  • POP Host: pop.charter.net
  • POP Port: 110
  • Required SSL: SSL/TLS
  • POP Username: Your full email address
  • POP Password: Your Spectrum Mail Account Password

POP Settings

  • POP Host: pop.charter.net
  • POP Port: 110
  • Required SSL: SSL/TLS
  • POP Username: Your full email address
  • POP Password: Your Spectrum Mail Account Password

Related Post – How To Fix Roadrunner Email Not Working Problems?

Spectrum email settings Outlook

In Case your Spectrum email account is not working properly on your Outlook email software, then maybe there is some configuration error. Thus to eliminate the issues you face, you have to reconfigure your Spectrum email.

To do so, follow these steps:

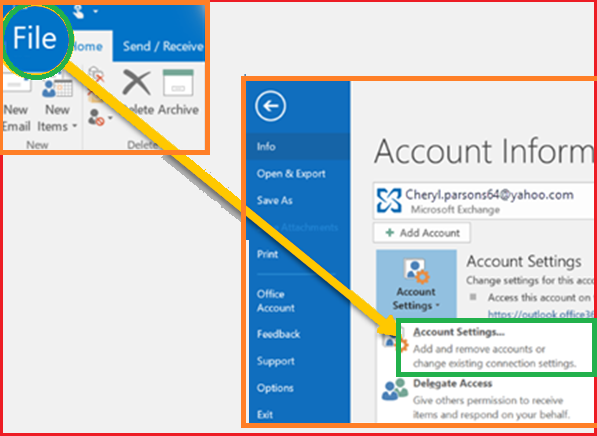
  • Go to Outlook and click on the “File” menu available at the top left corner of your screen.
  • After that, check the “Info” section, and there click on the “Account Settings” option.
  • A drop-down list will appear in front of you; there, you have to click on “Account settings” again.


  • After that, Choose the Charter Spectrum email account that is facing issues while working on Outlook and hit on the “Remove” option.
  • After that, complete the removal process by deleting the offline Caches.
  • Now you have to add your Spectrum account to Outlook again.

Instructions to follow to add an account on Outlook:

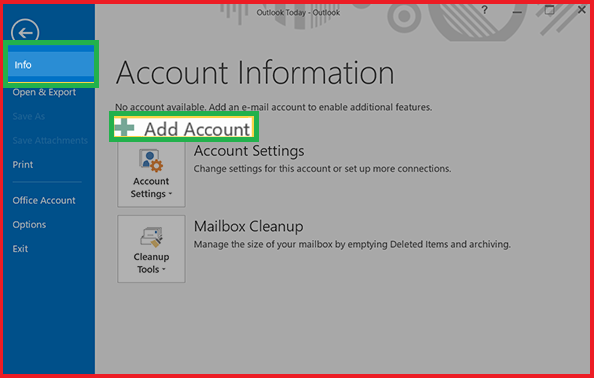
  • Open Outlook, then select the “File” tab
  • Then again, reach the “Info” section of the page and hit on the “Add Account” option.

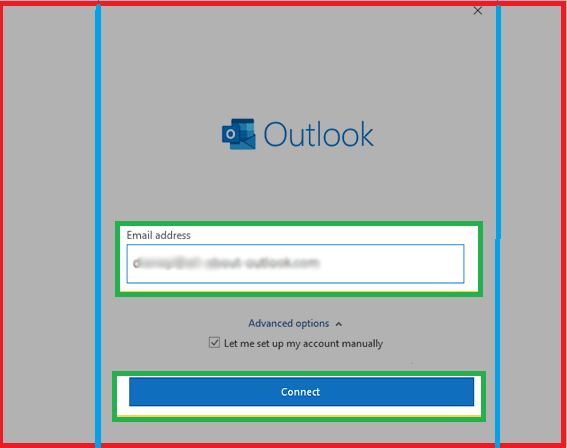
  • Then in the required box, enter your “Spectrum Email Address,” followed by clicking on the Advanced option.
  • Now click on the option to Manually configure the account, and hit the “Connect” Button.
  • Thereafter, you have to Choose the Account Type (IMAP or POP, however, IMAP is always recommended)

  • Then, the mail server setting page will appear in front of you.
  • Enter the “incoming mail” and “outgoing mail” server settings, and after that hit the Next Button.
  • At last, you have to enter your Spectrum email password and hit on the Connect button.

By this, your Spectrum account is all set to work on Outlook.

Ending Note 

Hopefully, after reading this guide, your Spectrum email not working issue will be resolved. However, if you have any kind of further Query in your mind, you can simply contact us. We are available 24*7 for you to help you out by resolving all your issues. So, feel free to email us your Query at info@emailnotresponding.com

SBCGlobal Email Not Working

With a spike in virtual conversations, more and more people have switched to email provider services to share data and communicate. With such development in the technical field, if there is one thing that hasn’t changed, its software issues, such as SBCGlobal email problems. 

We are here to talk about the errors that are faced by the users of SBCGlobal. From SBCGlobal.net email not working to login problems, a user must have seen it all. Today, we will help you understand the reasons and solutions to resolve your email, not working issues.

SBCGlobal is an ATT product that many people put their trust in. This emailing platform offers many services and high security to the data of the users. However, people do sometimes encounter some hindrances while working on it.

If you are irked with the SBCGlobal email not working, then keep reading this write-up till the very end.

Issues that SBCGlobal Users Encounter

Before we understand what causes issues in your SBCGlobal operations, here are the problems that people usually face while working on their accounts:

  • Can’t access the SBCGlobal account
  • Account password not working
  • Slow loading of SBCGlobal account
  • SBCGlobal email not working
  • Can’t download email attachments
  • Issues with sending and receiving emails
  • SBCGlobal not working on iPhone
  • Unable to run SBCGlobal on Android
  • SBCGlobal not working on Outlook
  • Email not responding correctly

What Triggers SBCGlobal Email not Working Issue?

Quite a few problems can be the reason why a user faces this problem. To resolve those, you first need to know what they are. Take a look:

  • Weak internet connections
  • SBCGlobal server down 
  • Outdated version of web browser
  • Using incorrect login ID and password
  • Issues with SBCGlobal email settings
  • Wrong browser settings
  • Using a hacked account
  • Incorrect time and date on your device
  • Corrupted extensions added to your web browser.

Read Also: How to Fix SBCGlobal Email Login Problems?

Troubleshoots to Fix SBCGlobal Email Not Working

Different people use different devices to run SBCGlobal. Here is a stepwise ABC for each of those.

SBCGlobal Email not Working on iPhone

SBCGlobal Email not Working on iPhone

“Why am I not able to work on my SBCGlobal account on iPhone?”, “Why can’t I login to my SBCGlobal net account?” Do these questions sound familiar to you? If so, then follow the steps below to overcome it:

  • Firstly, make sure your iPhone is connected to a high-speed internet connection.
  • Also, check if you are putting in the right login credentials. If you do not remember the ID or password, recover it. This is a very common reason people can’t log into SBCGlobal email. 
  • You might also get the SBCGlobal.net email stopped working error message if the ATT server is down.
  • If nothing works for you, clear the cache and cookies of your phone. 
  • Go to your mobile settings and remove the SBCGlobal account. Thereafter, re-add it to check if the problem is resolved.
  • In addition to that, make sure your server configuration is correct.

For IMAP

  • Incoming server: inbound.att.net
  • Port Number: 993
  • Security Encryption: SSL/TLS
  • Email: Enter your SBCGlobal account address
  • Password: Put in the account password correctly

For SMTP

  • Outbound server: Use outbound.net
  • Port Number: 465
  • Security Encryption: SSL/TLS
  • Email: Enter your SBCGlobal account address
  • Password: Put in the account password correctly

Read Also: How to Reset SBCGlobal Email Password Easily?

SBCGlobal Email not Working on Mac

SBCGlobal Email not Working on Mac

Mac users can try their hands on the following to overcome SBCGlobal email problems 2022: 

  • First of all, open your device and go to Settings.
  • There, in the search bar, type Mail and click OK.
  • You will eventually see the folder; open that.
  • Thereafter, look for the Accounts option and select Add Account.
  • Here, you will see a list of various email service providers.
  • If SBCGlobal is not in there, then select Others and add your account.
  • Put in your login ID and password.
  • Next, you will see the field “Description.” This is where you need to enter SBCGlobal.
  • Hit Continue and then set your server settings.
  • Choose POP and add inbound.att.net as your hostname.
  • Also, under the outgoing server, put outbound.att.net.
  • Finally, select the Save button.

These steps are a simple and easy answer to why my SBCGlobal email is not working.

SBCGlobal Email not Working on Outlook

SBCGlobal Email not Working on Outlook

Wondering if SBCGlobal email down? SBCGlobal email users often use MS Outlook to access their accounts. If you are unable to work on the SBCGlobal email account on MS Outlook, here is what you can do: 

  • Try editing and configuration settings of SBCGlobal in Outlook.
  • If the SBCGlobal email not working 2022 issue is happening because of the server, change it from IMAP to POP. 
  • Also, remove the account and add it again in Outlook. This might help you overcome the problem.
  • Your antivirus might also be acting as a restriction. Disable it for some time, and then try to access your account.
  • Outlook has a Safe Mode setting. If nothing else works for you, open the application in Safe Mode.
  • You can also go to Network and switch it to Google DNS.

You no longer will need to ask what happened to SBCGlobal.net after these troubleshoots. 

Read Also: How to Resolve SBCGlobal.net Email Not Responding?

SBCGlobal Email not Working on Android

SBCGlobal Email not Working on Android

There are users who like to have their accounts accessible all the time. The best way to do this is by opening your account on your mobile. If you are wondering “Why I can’t sign into the SBCGlobal email in Android, here is how to resolve it:

  • Switch off and restart your phone.
  • Also, ensure that you have an internet connection.
  • Verify your IMAP settings and match them with the following.
    • Incoming mail server: mail.yahoo.com
    • Incoming port: 993
    • Encryption: SSL
    • Outgoing mail server: mail.yahoo.com
    • Outgoing port: 467 or 587
    • Encryption: SSL
    • Authentication: Yes
  • If nothing works, reinstall the SBCGlobal application on your Android.
  • Also, check if SBCGlobl.net is down by using one of these sites:
    • Downdetector
    • Is it down right now?
    • Downrightnow

SBCGlobal.net Email not Working on iPad

SBCGlobal.net Email not Working on iPad

SBCGlobal email not working today? For iPad users facing email issues, read ahead to see how you can set up your account correctly.

  • To resolve SBCGlobal email issues, you first need to open Settings on your iPad.
  • Once you are there, locate the Mails, Contacts, and Calendars option.
  • Next, look for the Add Account tab and click on the same.
  • After that, your screen will display a list of several email providers.
  • Look for SBCGlobal or click on Others to add that to the list.
  • Furthermore, enter your SBCGlobal account credentials and select Sign-in.
  • Finally, set the server configuration and hit the Save button.

SBCGlobal not Working in Windows

SBCGlobal not Working in Windows

Now, if you use SBCGlobal on Windows and are unable to get it running, you might be facing an SBCGlobal email issue 2022. Resolve it by using the below-mentioned solutions:

  • Connect your PC with a strong Wi-Fi connection.
  • Use browsers that are compatible with SBCGlobal. There are many web browsers available in the market, but only a few can run SBCGlobal smoothly. Try signing in on Google Chrome or Mozilla Firefox.
  • In case you have any pending updates to your browser, update it. Head to Settings and check for updates.
  • Make sure there exists no cookies or cache on your data. This is a very common and easily neglected reason behind SBCGlobal login issues. 
  • People add various extensions to their browsers for smooth operations. There are chances that one of these extensions is creating trouble. Try disabling the extension and then log in to your SBCGlobal email account.
  • If you have an antivirus running on your PC, that might be restricting the login site of SBCGlobal. Go to Settings and temporarily disable it. Again, go to SBCGlobal and see if you can access your account now.
  • In case none of the above solutions help you overcome the problem, then use a different browser. No matter even if you are working on Chrome, switch to another one to see if the browser was the core of the issue.
  • While logging in, make sure you are entering the correct email address and password. If you do not remember either of the information, you can recover it by clicking on Forgot ID/Forgot Password.

Read Also: How to Recover Hacked Sbcglobal Email Account?

Summing Up

SBCGlobal has become one of the people’s favorite email service providers over the past few years. More and more people have switched to this software because of the latest features and options it offers. In addition to that, its data-protection settings also attract the crowd.

No matter if you access your account from Windows or Mac or from your iPad, here you must have found the solution for it all. This handbook holds all the possible solutions to the SBCGlobal mail not working issue.

How do I Fix Comcast Email Not Sending

One of the most sought-after online communication platforms, Comcast Email Services, has carved a niche of its own in the email communication world. Offering a host of options and features to you within arm’s reach, Comcast Emails or Xfinity is a name to be reckoned with.

Apart from offering varied emailing features, it brings to the table ease of platform-wide support and a secure service guarantee. All these amazing features and functionalities that too at zero cost. Yes! You got it right. Comcast is absolutely free for users. These awe-striking features make it ideal for both personal as well as professional use.

Comcast Not Sending Email: Error Description

As it happens with any other piece of software, the same goes with Comcast emails. Like any other software-based service out in the market, it is also prone to glitches and issues. Users may face discrepancies in this software from time to time.

With a little knowledge and some technical know-how, these issues can be easily and readily resolved. This article discusses issues that users face while using Comcast and the various ways in which those issues can be identified and resolved.

Before we try solving a particular problem, we might want to know the exact problem, why it occurs, and what are the ways in which we can identify them. This helps us to gain a better insight and understanding of the problem. This paves the way for the solution quite easily.

What are the problems being faced by Comcast Users?

There can be a myriad of issues that a particular Comcast user might face using their Comcast account. Following is a curated list of all the plausible causes that one might face while using Comcast:

  • When the email platform runs sluggishly.
  • There might be issues with the Comcast Account.
  • The user could be facing login issues with the Comcast ID.
  • A user is facing trouble in sending or receiving emails.
  • The Comcast Id might not be working on Android.
  • One might face issues while opening mail on the browser.
  • The Comcast email service might not be working properly on Apple devices.

Now that we have understood the problem, the next logical step is understanding the root cause behind the “Why is my Comcast mail not working” issue. It is only after that we have understood the reasons that cause the Comcast Email not working issue that we are able to better resolve the problem.

Why Is My Comcast Email Not Working?

There could be a host of reasons responsible for causing Comcast not working issue. Following is a list of plausible causes behind this particular problem:

  1. Improper internet connection
  2. Issues while using Third-party software
  3. An outdated version of the browser
  4. An unsupported browser (Comcast not supporting browser)
  5. Comcast Servers may not be functioning properly

Now that we have identified the problem and understood the reasons behind the problem, we would want to proceed toward the resolution of this particular problem. Here is a list of possible troubleshooting methods that can help you resolve the issue:

Read Also: Why Are My Comcast Emails Keep Disappearing?

How to Fix Comcast Email Not Working? Explained

Now that much has been said about the error, let’s proceed further and try the best solutions to troubleshoot this problem:

Method 1: Disable Your Spam Filters To Fix The Issue

An enabled spam filter is one of the most apparent reasons behind this error. When the spam filters are enabled, you may not be able to get emails in Comcast. Therefore, you need to disable it by following the below-given steps:

  • First of all, you need to sign in to the Comcast account by typing in your accurate login credentials.
  • Thereafter, move down to the users and preferences and click the edit button located on the spam filter option.
  • Here, you need to choose the “disable spam filter” option and then click the save button.
  • Once the procedure is concluded, sending and receiving emails will become smoother in Comcast.

Method 2: Modify Your Security Settings

Erroneous security settings can also bring forth the error in sending/receiving emails in Comcast. You need to rectify it in order to get rid of the error. Below are the steps:

  • First thing first, navigate to the outgoing mail server settings. Here, you need to make sure that the security settings are configured to Auto.
  • If not, you need to select the TLS option.
  • SSL settings would work previously; however, the outgoing mail works optimally with the TLS option we have selected in this procedure.

If the error continues or is caused due to some other reason, move to the next solution.

Method 3: Make Sure That You Have A Strong Internet Connection 

Internet is the basic requirement to send or receive emails from Comcast. Before you move ahead to resolve the complex technical issues, make sure that your Internet is strong and stable. Check your Internet connection and if you are a WIFI user, try to restart the router after closing it for a few seconds. Contrarily, if you are using your cellular data, check your network connection settings.

Method 4: Ensure That The Contacts Are Not Blocked 

If the error continues to occur, confirm that you are not sending this email to a blocked contact. To verify, you need to open your block list in Comcast and check if the contact you are trying to send email to is there or not.

If it is there, unblock the contact and try to send the email again. This time you will be able to send an email.

Method 5: Clear Your Cookies & Cache 

Sometimes, your Comcast email gets piled up with extensive cookies and cache. If you don’t delete it, it may affect the performance of your email account and give rise to some other issues.

Contrarily, when you clear your cookies and cache on a regular basis, it keeps your email sending and receiving smoother. On getting the error, clear cookies and cache from your Internet browser through which you are trying to open your email.

Read Also: How to Fix Comcast Email Is Not Working on iPhone

Method 6: Other Issues Related To Comcast Email

In the other issues, you need to check for the below-given conditions and fix them:

  • Check if the maximum limit for sending and receiving emails is not exceeded.
  • The proper functioning of the Comcast email requires some free storage space. If not, you may face trouble in sending or receiving emails from Comcast.
  • Make sure that you enter the receiver’s correct email address without making any mistakes.
  • Confirm that you are not blocked by the sender.
  • Sometimes, a lost email can be found in the spam or trash folders. In such a case, you need to search the email in these places.


Login To CenturyLink Router

CenturyLink router is one of the best routers available in the market. In case, you are planning to buy a new router, then the CenturyLink router can be the best option available for you. Well, this blog post will help you to make the purchasing decision of CenturyLink Router.
In this write-up, we will provide you with complete information about the CenturyLink Router login process, so that after bringing it home, you will be aware of how login to the router. So, stay tuned and read this blog post till the last word.

CenturyLink Router

How to Login to CenturyLink Router?

Let’s have a look at the step-by-step easiest guide to log in to your CenturyLink router.

Step 1. Connect the Network Via Wi-Fi or Network Cable

  • The first step in the login process is connecting the network through Wi-Fi or cable.
  • If you are using a device which is not connected to the network, then you may face CenturyLink router login issues.
  • Devices which are connected to the network, will only be able to log in to the router. So, you must ensure that you have connected the device with the network.

Step 2. Run a Compatible Web Browser

  • Once you have checked the network connection, the next step is running a compatible web browser on your device.
  • Also, you must ensure that you have provided enough permissions to the browser to work smoothly.

Step 3. Visit CenturyLink router login page

  • After opening the compatible web browser, type 192.168.0.1 or 192.168.1.1 in the search box and click on the search icon.
  • This will now redirect you to the CenturyLink login page.

Modem URL

Step 4. Provide login details

  • Now, on the Login page, you will be asked to provide the username and password in the insert fields and then click on the “Apply” option.
  • In a scenario, if you have not changed the username and password yet, then you have to write “Admin” in the username box and “password” in the password box.

Provide login details

Congrats, by performing the steps mentioned above, you have now successfully logged in to your CenturyLink router account.

How to Change CenturyLink Router Login Password?

The admin password is there to secure the router settings. We recommend you to change the CenturyLink admin password immediately after you log in to the router account. Here are the steps that you can follow to change the CenturyLink router login password.

  • First, once you log in to the router, click on the “Advanced Setup” option.

Advanced Setup

  • After that, from the left-hand side menu list, click on the “Security” option, followed by a click on the “Administrator Password” option.
  • Thereon, perform a click on the “Enable Checkbox” option.
  • Next, you have to provide the new administrator username and password details. Here, you will be asked to provide the password twice in the insert fields.
  • Now, click on the “Apply” option to save the updated changes.

You have now successfully changed the login password of the CenturyLink router. From now on, you have to provide the new login password each time you log in to the account.

How to Reset CenturyLink Router Password to Default?

Have you decided to reset the CenturyLink router password, then here are the steps you can follow to reset the password to default.

  • The foremost thing in the process is to switch on the router. You can do so by pressing the power button.
  • After that, press and hold the reset button available on the back side of the device. Keep holding the button for around 30 to 40 seconds.
  • Now, remove the main socket wire of the router and keep pressing the reset button for 30 to 40 seconds.
  • At last, leave the router in the idle position for around 5 to 6 minutes and then turn on the power again.

By following the above steps, you have now successfully reset the CenturyLink router password to default. From now on, you have to use the default username and login password for accessing the router account.

Read Also: How To Change CenturyLink WIFI Password?

How to Change Wireless Security Password of CenturyLink Router?

Given below are the steps that you can follow to change the wireless security password of the CenturyLink router.

  • The initial step is to log in to the router account.
  • Thereon, click on the “Wireless” tab option.
  • Under that option, you have to click on the “Wireless Security” menu option.
  • After that, under the list of security options, click on the “WPA/ WPA2 – personal” option.
  • Now, type “Wireless Password” in the insert field. Here, you have to provide the Wi-Fi password.

WPA WPA2 personal

  • At last, click on the “Save” option to save the new Wi-Fi password.

Configure CenturyLink Router Settings

Given below is the procedure that you can follow to configure the CenturyLink router settings.

  • First, connect to the CenturyLink router and access the router admin page.
  • After that, provide the login credentials of your router.
    Thereon, the user will be able to access several router settings.
  • Now, access the DNS settings, and configure the tri-band settings.
  • At last, click on the required section and implement the necessary changes.

Once you are done making the necessary changes, then exit the page.

How to Update CenturyLink Router Firmware Software?

Updating the firmware software can help you to fix many bugs in the router and can also result in general improvements.
Here are the steps that you can follow step by step to update the CenturyLink router firmware software.

  • First of all, you have to check the model number and version of the CenturyLink that you are using so that you can download the correct updates.
  • Thereon, go to the CenturyLink help page and accept the licensing agreement and terms and conditions.
  • Now, download the firmware file.
  • After that, connect the router to the PC, and we recommend you upgrade the firmware through wired connections only.
  • Moving ahead, use a compatible web browser and access the router’s web-based setup page.
  • You will be asked to provide the login credentials in the details.
    Thereon, click on the “Administration” tab option and click on the “Firmware Upgrade” process.
  • Moving ahead, click on the “Browser” button available there.
    Now, select the file the user wants to download from the help page and click on the “Open” option.
  • Followed by the above steps, you have to click on the “Start Upgrade” option and continue the process till you are prompted with a message that the upgrade has been completed.
  • At last, restart the router to complete the upgrading process.

By following the above steps, you have now successfully updated the Firmware software of the Century Link router.

Ending Note:

We hope you find this blog well. In this post, we have tried our best to provide you with authentic and exact steps that you can follow to log in to the CenturyLink router. If even after following the steps mentioned above, you still need the CenturyLink router login help, then you can reach out to our professional experts. You can write us your query through mail at info@emailnotresponding.com or talk with us through the chat box. Our professionals are available 24/7 to provide the solutions for your query.

How to Set Up Bellsouth Email on an Apple iPhone

BellSouth, formerly known as BellSouth Corporation, is an American telecommunications company that is based in Atlanta. Its email, called the BellSouth Email Service, was developed with the aim of providing a seamless emailing experience for its users. After it merged with AT&T in late 2005, BellSouth and AT&T have assimilated in the working of the platform to be a thing of remarkable admiration from its users.

The BellSouth email service is highly commendable as it provides a varied range of features, from automatic replies and forwarding to the option of redirecting emails to adding multiple recipients for one mail and many others. This email service can be configured on all your devices by making the correct BellSouth email settings. In this blog, you will learn various things such as “How to Set Up BellSouth Email on an Apple iPhone”, “How to set up bellsouth.net email on android“, and “How to set up bellsouth.net email in outlook,” etc. So, read on carefully till the end to understand it fully.

How to Setup BellSouth .NET Email on Android?

In order to set up the BellSouth Email on Android, you need to follow the below-mentioned steps:

  1. Firstly, open up Gmail or any other email client on your android device.
  2. Thereafter, tap on the menu and then tap on the Add Account from this menu
  3. Choose the Other option from the list of email service providers
  4. To configure the settings yourself, select the manual setup
  5. Thereafter, put in the BellSouth Email Address
    Subsequently, follow the below-mentioned steps to make the proper Bell South Email Settings for the POP3 or IMAP
  6. If selecting POP3 then the inbound server would be att.net and
  7. when choosing IMAP, the inbound server would be mail.att.net
  8. Port should be set at 995 for the POP3 and 993 for the IMAP.
  9. Consequently, choose Yes for the required SSL for both POP3 and IMAP
  10. thereafter, enter in your password and tap on the Next option
  11. Lastly, you need to verify the email, and this will complete the process

How to Setup BellSouth .NET Email on iPhone?

Setting up the BellSouth Email on iPhone is quite an effortless task if you know the steps involved in this. The BellSouth Email can be set up on iPhone by following the steps given below:

1.) Firstly, open the Settings on your iPhone and then choose the option that says Mail, Contacts, and Calendar.

2.) Secondly, choose BellSouth Email from the list of all email service providers.
3.) Tap on the Add Mail option and then enter your email address, name, password, and then the description

4.) For the BellSouth IMAP server and POP3 settings, you need to make the following changes:

Inbound Server: For POP3, set att.net; for IMAP, set mail.att.net

5.) Set the port of the inbound server as 995 for POP3 and 993 for IMAP
6.) SMTP server should be set as att.net and IMAP server as mail.att.net
7.) Select the Yes option for the Required SSL for both POP3 and IMAP

If you follow the above-mentioned instructions, then you can easily set up the BellSouth Email on your iPhone. Using this BellSouth Email service on your phone, you can easily utilize this service from any time and anywhere, making your life pretty convenient and more reachable.

How to set up BellSouth.net email on iPad?

Similar to all other device configurations, you require the correct email settings to set up BellSouth Email on iPad. To set up the BellSouth Email on iPad, you need to follow the steps mentioned below:

1.) Firstly, access the Settings option on iPad. Now, click on the Mail, Contacts and Calendars option from the menu.
2.) Secondly, tap on the Add Account Option. This will show you a list of all email service providers. IF BellSouth is present, choose the option; otherwise, select Other
3.) Thereafter, tap on the Add Mail account and then insert your username with the password for your BellSouth account.
4.) Subsequently, tap on the Next option and then enter the following settings for IMAP and POP3 server.
5.) Inbound Server: att.net (POP3), and mail.att.net (IMAP)
Port: 995 (POP3) and mail.att.net (IMAP)
6.) Finally, select Yes for Required SSL for both POP3 and IMAP

Steps to setup BellSouth Email on Mac

If you need to understand the process of setting up the BellSouth Email on Mac, then you have come to the right place. You can very easily setup your BellSouth Email on Mac using the following steps:

1.) First of all, open up the Mail on your Mac and click on the Preferences option.
2.) Thereafter, choose the Accounts option and then choose the + (plus) sign.
3.) Thirdly, choose the Add other mail option and then click on the Continue option
4.) Now, you will need to fill in your mail account information such as full name, BellSouth email address, and password.
5.) Make the following changes in the BellSouth Email Settings such as:

  • Incoming mail server – inbound.att.net (POP3) or imap.mail.att.net (IMAP)
  • Outgoing mail server – outbound.att.net (POP3) or smtp.mail.att.net (IMAP)

6.) Select the Edit SMTP server list in the outgoing mail server.
7.) Confirm by setting the following:

  • Server name – Outbound.att.net or smtp.mail.att.net
  • Ports – 25, 465

8.) Choose the Use Secure Sockets Layer is selected
9.) Lastly, click on OK to complete the process.

Following the above steps, you can easily set up the BellSouth Email on iPad. This email can now be used on your iPad anytime, anywhere.

Since you have now understood how to set up the BellSouth Email on your Mac, you can now very easily configure it on your system and make this entire emailing experience much more enjoyable.

How to Set up BellSouth.net Email in Outlook?

Like all other device configurations, you can set up a BellSouth email on outlook by following the steps mentioned below. It is quite simple to do and does not require any specific expertise.

1.) Firstly, open up your Outlook account and click on the File option at the top-left corner of the screen.
2.) As soon as the file menu opens, choose the Add Account option
3.) From the given options, select the “Manual Configure Server settings or additional server types” and then click on the “Next” option
4.) A Setup wizard will display on the screen
5.) When the system asks, “Would you like to configure an Email account?”, choose the Yes option
6.) Thereafter, you need to make the necessary changes in the email settings such as:

  • Either select the IMAP or POP 3 from the given options and then click on the Next option.
  • The incoming mail server for the POP 3 needs to be pop.mail.yahoo.com
  • The outgoing mail server for the SMTP needs to be smtp.mail.yahoo.com
  • Consequently, fill in your username and password where it is needed and then choose More Settings
  • Select the options that say “My outgoing server requires authentication” and “Use Same Settings as my incoming mail server.”
  • Thereafter, click on the Advanced Tab and Enter
  • Subsequently, enter the incoming server port number as 995 for POP3
  • The outgoing server port number needs to be 465
  • You need to choose SSL to Use the following type of encrypted connection
  • Lastly, select OK and then click on Next and then “Finish”

Related Page: How to Fix Bellsouth Email not Working

Conclusion:

We have described above, in detail, the steps to set up BellSouth Email on Outlook. BellSouth Email is compatible with almost all devices, including Mac, iPhone, iPad, and Android, etc. This makes it easier to use and more efficient for daily emailing activities. If you wish to know more about such services or anything related to the same, feel free to contact us through our website [emailnotresponding.com] or send us an email at [info@emailnotresponding.com].

How To Change CenturyLink WIFI Password?

Remembering a WIFI password for life long is not possible for anyone. We all, somehow, due to other important activities in our life, cannot remember a WIFI password for a long time. Although, it’s quite normal.
If you are using the CenturyLink WIFI services, this blog will be important for you. In this blog, we will take you through all the steps you can follow to change the CenturyLink WIFI login password. So, stay tuned till the end of this blog post.

What are the Ways to change CenturyLink’s WIFI Password?

When it comes to changing the CenturyLink WIFI login password, there are two different methods the user can follow to get it done. So, below are the steps that the users can follow to change the WIFI password of CenturyLink.

  • With the CenturyLink application.
  • Through secured modem settings.

Before you jump on to the password-changing methods, if you can’t remember the WIFI login details, you need to understand how to find your login details.

How to Find your CenturyLink WIFI Details?

You can easily check your WIFI details through the Modem’s user settings interface.

    • First, make sure to connect your PC to the CenturyLink internet through WIFI or with the help of an Ethernet cable connection.
    • After that, open a compatible web browser and enter “http://192.168.0.1” in the insert field.
    • Then, log in to your Modem’s settings interface (Modem GUI) with the help of the Admin username and password details.
    • Remember, these details are not identical to the wireless network name (SSID) and WIFI password.
    • After that, click on the “Wireless Setup” option from the main menu list.
    • Now, scroll down to check the wireless settings, i.e., Network Name (SSID) and Security Passphrase (WIFI Password). Here, you can see the security type and WPS pin as well.
    • Note these details in the notepad so you can use it while changing the wifi login password.

Read Also: Login To CenturyLink Router

How to Change CenturyLink WIFI password?

Method 1: Changing CenturyLink WIFI password CenturyLink Application

So, below mentioned are the steps that you can follow to change the WIFI password with the help of the CenturyLink application.

  • At first, launch the CenturyLink application.
  • Then, go to the “Control Your WIFI” section.
  • Under that, click on the “Networks” option.
  • After that, select the WIFI network of which you want to change the password.
  • Then under the Network Details, tap on the “Change Network Settings” option.
  • After that, you can easily update or change your WIFI password on the new screen.
  • At last, after entering your new password, click on the “Save Changes” option to apply the new changes

Method 2: Changing CenturyLink WIFI Password Through Secured Modem Settings

If you want to change CenturyLink’s WIFI password through secured modem settings, then below are the steps you can follow to get it done.

  • At first, connect your PC to the CenturyLink internet through WIFI or with the help of an Ethernet cable connection.
  • After that, run a compatible web browser, enter “http://192.168.0.1” in the search box, and then hit the search button.
  • After that, log in to the Modem’s settings interface (Modem GUI) with the help of your admin username and login password.
  • Then, click on the “Apply” option.
  • On the next screen, click on the “Wireless Setup” option.
  • If you see two different frequency options, i.e., 2.4 GHz or 5 GHz, then you have to change the passwords for both frequencies by performing the below-mentioned steps.
  • Now, select one of the frequency options and then click on the “Wireless Security” option on the left side of the menu.
  • After that, select your wireless network (SSID) and security type option.
  • Then select the encryption type as “Both” and then give the authentication type by choosing the “Open” option.
  • To change the WIFI password, select the “Use Custom Security Key/Passphrase” option, followed by entering your new password in the insert box.
  • At last, click on the “Apply” option to save the updated changes.
  • Now, you must connect all your devices to the CenturyLink WIFI with the new password.

How to Set The An Administrator Password on the CenturyLink Modem?

So, below mentioned are the steps that you can follow to set an administrator password on the CenturyLink WIFI.

  • First, connect your device to the internet through WIFI or with the help of the Ethernet cable.
  • Open a compatible web browser and type “http://192.168.0.1” in the insert box.
  • It will redirect you to the modem settings. Now, enter your username and password to log in to the account.
  • After that, click on the “Advanced Setup” option.
  • Then under the security section, search for the “Administrator Password” and click on it.
  • After that, check that the “Administrator Password” feature is enabled.
  • Now, it will ask you to enter your new username and password details.
  • At last, click on the “Apply” option to save the updated changes.

Important Tips for Creating New Password of the CenturyLink WIFI?

So, while creating a new password for the CenturyLink WIFI, below are some of the important tips you keep in mind while performing the task.

If you have selected 64 or 128 bits, then keep these guidelines in mind.

  • 64 Bits: Type a maximum of 10 characters.
  • 128 Bits: Type a maximum of 26 characters.

The characters can only contain alphabets between A to F and numbers between 0 to 9 with no spacing.

In the rest of the cases, these are the guidelines that you must follow.

  • Keep the characters between 8 to 63 characters.
  • Use at least one number between 0 to 9.
  • Then contain at least one character A to Z.
  • Space characters can be used in the password, but it’s not mandatory.

Wrap Up

In this blog, we have listed all the possible ways and methods you can follow to change the CenturyLink WIFI password. Apart from that, we have also listed some important information related to the topic. In case while performing any of the steps or if you have any general query related to the CenturyLink, feel free to reach out to our professional experts through the chat box, or you can also mail.

How To Fix Roadrunner Email Not Working Problems?

Roadrunner is one of the most famous and popular email service provider which is known for its unique features, user interface, and excessive storage capacity. Subsequently, where the roadrunner is getting huge popularity, the main problem which troubles the users is that sometimes, the Roadrunner email is not working properly.

Facing problems while using any online email service is quite normal. The point where the situation can become trouble is when the users are not able to get the problem resolved. That’s why we are here to help you. So, let’s discuss this problem in depth.

Why is My Roadrunner Email Not Working?

So, these are the possible reasons due to why the Roadrunner email is not working.

  • Entering wrong login credentials of your email account.
  • IMAP or POP settings are incorrect.
  • Not able to remember the login password of the email account.
  • Internet connectivity issues.
  • Backend issue with the spectrum net server.
  • When the roadrunner email account has been hacked.
  • The email account has been deleted due to inactivity.

Main Challenges with Roadrunner Email

Once you are cleared with all the possible reasons due to which the Roadrunner email users are facing the email not working problems. Now, let’s have a look at the issues or the challenges that the roadrunner email users are facing.

  • Unable to change IMAP and POP3 settings.
  • Closed email account.
  • Forgotten Roadrunner email account login credentials.
  • Basic email login issues.
  • Roadrunner sign up and set up issues.
  • Failed to create a backup of email data.
  • Failed to recover login password.
  • Not able to send or receive new emails.
  • Unable to use mail inbox on android or mobile.
  • Unable to sync or load roadrunner email contacts.
  • Not able to block the unwanted email address.
  • Failed to restore deleted emails.
  • Not able to send attachments.
  • The issue in configuring Roadrunner email with the email provider.
  • The server of TWC Email is down.

How To Fix Roadrunner Email Not Working Problems?

Here are the troubleshooting methods that you can follow to solve the Roadrunner email working problems.

Solution 1. Update Roadrunner Email Settings

When you are running the Roadrunner email on a third-party client, then there might be a chance that the server settings are incorrect. We strongly suggest you to first have a look at the email settings and make sure that they are correct. So, here are the most updated and recommended email server settings that you must use in your email account.

RR Incoming Server Settings

  • Username: Your unique email address
  • Password: Your login password
  • Server: pop-server.maine.rr.com
  • Port: 110
  • Security type: None

RR Incoming Server Settings

  • Username: username@maine.rr.com
  • Password: Your roadrunner email login password
  • Server: smtp-server.maine.rr.com
  • Port: 587 or 25
  • Security type: None
  • Sign-in required: Check or select

Solution 2: Check the Server Status of Roadrunner Email

If the server of spectrum email is down from the backend, then all the related services of roadrunner and TWC will stop functioning. You can use various server status websites such as down detector, and site checker to check the status of your email account. Through these websites, you will get all the information about the problems that the website is currently facing.

Solution 3: Solving Roadrunner email login issues

As soon as you have noticed any login issue with the email account, then there is a need to solve the problems immediately. Some of the common login problems like forgotten email password, hacked email address, security key not working, etc.

Changing the password can also help to deal with login issues. So, to change (reset) the login password of your email account, here are the steps that you can follow.

  • Go to the spectrum login page.
  • Now, click on the Forget Email Password option.
  • After that, answer the security questions and fill out the Captcha form.
  • A new page for resetting the login password option. Enter your new password twice and click on the save option.
  • You have now successfully reset the login password of your email account. Now use your new password to log in to your email account.

Solution 4: Solving Roadrunner email issues on Android

If you are facing login issues in your Roadrunner email account on your android mobile, then these are the troubleshooting methods to solve the problem.

  • First of all, open the mail application on your android mobile.
  • Now, enter your email address for the RR email account in the insert box.
  • Then select POP for roadrunner email incoming server settings.
  • Type your RR email login password and make sure to provide the settings for the POP or IMAP server.
  • At last, provide the required settings for the IMAP server and click on the “Done” option.

Solution 5: Solving Roadrunner email issues on iPhone

  • First, go to the email settings and click on the “Mail, Contact and Calendar” option.
  • Click on the add account option and provide your roadrunner email account login credentials.
  • Under the incoming email server, type the POP settings and in the outgoing mail server, type the IMAP settings.
  • At last, click on the “Save” option.

Solution 6: Updating Browser

When you are using an outdated web browser, then the email server will not be able to meet the minimum requirements for working efficiently on your device. Updating the web browser to the latest available version can help you to get rid of the problem. This can also help you in solving various unwanted circumstances such as sign-in issues, and a blocked roadrunner email account. So, whether you are working on Mac, Windows, Android, or iPhone, just simply update your web browser to the latest available version.

Also, try to delete cache and cookies from your browser’s history and make sure to select the time range to “All Time”.

Solution 7: Solving email attachment problems

If you are not able to attach documents in a mail, then we suggest you to look at these below-mentioned factors.

  • Make sure that the document size is not so large and must be less than 30 MB.
  • Solve the problems related to the web browser.
  • Fix internet connectivity issues.
  • Use online links for the file instead of attaching the original document.

In case, if you are not able to open the attachments from a received mail, then these are the troubleshooting solutions that you can follow to solve the issue.

  • Make sure that the file is downloaded properly.
  • Restart your device.
  • Turn off firewall and security programs.

By following the above-mentioned solutions, you can easily fix the Roadrunner email not working problem. In case, if you still have any queries, then we suggest you to visit the official support page of roadrunner.

Read Also: Suddenlink Email Login Issue

How to Fix Suddenlink Email Login Issue

The user interface of Suddenlink Email is so easy and reliable that its users don’t face login issues at multiple frequencies. Although, the most common issues that the Suddenlink email users are facing is related to the Suddenlink Email Login Issue. Although, it is not a big problem, but it can cause a trouble for the user when they are not able to check their important emails.

Suddenlink Email Login Issue

Most probably the login issues of an email account usually occurs when the users have entered wrong login credentials or if the internet connection is weak. The Suddenlink email login can be fixed easily by double checking the login credentials before submitting it. Apart from that, here are some of the common problems or issues that the Suddenlink email users are facing at high frequency.

  • Not able to reset the Login password of the Suddenlink email account
  • An email account is not sending or receiving new mails
  • Failed to set up filters
  • Not able to change email settings
  • Email account fails to respond
  • Failed to attach a document or file in the mail
  • Other basic login issues

How to Solve Suddenlink Email Login Issue

There are several factors due to which the Suddenlink email login issue can occur. The main requirement of performing any online activity is that you must have an active and strong internet connection. So, initially when you face the Suddenlink Email login issue, then first of all check for the internet connection and its speed. If there is no problem with the internet, then below mentioned are the basic troubleshooting steps that you must follow.

  • Clear all the browsing history, cache, and cookies from your web browser, and make sure to change the time range to “All Time”
  • Use a different and compatible web browser.
  • Update the PC’s windows and browser to the latest version.
  • Restart your PC.
  • Turn off all the browser extensions and plugins.
  • Delete all the background running third-party applications and programs from your PC.
  • Scan your PC from antivirus software and if any discrepancy founds, then fix it immediately.

By following the above-mentioned steps, then you will be able to fix the Suddenlink Email Login issues. In case, if the problem still exists, then we suggest you to contact the Suddenlink Email Helpline team to get help from their experienced customer care team.

Suddenlink Email Not Sending or Receiving Email Issue

However, the above-mentioned basic troubleshooting steps can only help you to solve the basic login issues. In case, if you are not able to send or receive new mails on your Suddenlink email account, then here is a method of solving the issue.

  • Web Browser: When you are using a web browser that is not compatible to meet the minimum requirements of running the mail application, then maybe it will disallow you to send or receive new emails. So, at first, update your web browser to the latest available version or try using a different web browser. After doing that, open the Suddenlink email account and check if the error has been resolved or not.
  • Mobile Devices: If you are using the Suddenlink email services on your mobile device, whether it’s iOS-based or android, you must check that there is ample available space on your mobile device. Also, try to delete or remove unwanted applications that are storing huge space in your mobile.
  • Email Clients Account: If you are using an email client account, then you must check that you are using the correct server settings. If the email settings are incorrect, then it can further stop you from sending or receiving new emails. Below is the detailed information about the Suddenlink email account settings.

Incoming Server Settings

  • Port (SSL): Use 993 for IMAP and 995 for POP
  • Server Name: pop.suddenlinkmail.com (POP) and imap.suddenlinkmail.com (IMAP)

Outgoing Server Settings

  • Port (SSL): Use 465
  • Server Name: smtp.suddenlinkmail.com (SMTP)

How to Recover Forget Username of Suddenlink Email Account?

In case, if you forget the username of your Suddenlink email account, then you will not be able to log in to your Suddenlink email account. So, to easily recover your existing username of the Suddenlink email account, here are the steps that you can follow.

  • At first, go to the login page of the Suddenlink email account i.e. https://authorize.suddenlink.net/.
  • On that page, below the login button, click on the third option “Forget Username”.
  • Once you click on that link, it will ask you to enter your contact email id in the insert box. Enter the id and fill out the captcha form and click on the “Next” option.
  • Make sure to provide the exact alternative email address that you have provided at the time of creating your account.
  • Now, Suddenlink will send you a mail at the registered email address along with your username.

Congrats! You have now successfully recovered your username of the Suddenlink email account.

How to Reset Suddenlink Email Login Password?

If you cannot remember your login password for the Suddenlink email account, then the option left with you is to reset the login password of your account. So, here are the steps that you can follow to reset the login password of your Suddenlink email account.

Suddenlink Email Login

login page

  • Then underneath the Login button, click on the second option displaying “Forget Username”.

Forget Username

  • After that, enter the username, answer the security question, fill out the captcha form and click on the “Next” button.
  • Now, select one of the password recoveries options as per your preference.
  • Then enter all the asked details in the insert box and follow the on-screen instructions to complete the password reset process.

password reset

Read Also: AOL Email Not Working On iPhone

Wrap Up

We hope that we helped you in providing all the necessary information about the Suddenlink Email login issues. In case, if you have any specific query related to the Suddenlink Email, then feel free to reach out to us through the help section. Our experienced and professional experts will be available to assist you better.

Why AOL Email Not Working On iPhone & How to Fix It

If you are also an existing user of iPhone and AOL email? Then most probably you have either faced the mail problems in the past or maybe will face it in future. As we have received many queries from our readers that their AOL email account is not working on their iPhones.

Many of us are using AOL email services for a very long time. While many users have started using Gmail and other email services, still the AOL email has maintained a loyal customer base for its old users. Although, when the words “Long time” come, it directly indicates that the user is using the AOL mail account to send or receive important emails. Facing an issue while using the AOL mail account is never pleasant. Where the iPhones have gained so much popularity, the main problem for AOL email users is that their mail account is not working on their iPhones.

Reasons Behind AOL Email Not Working on iPhone

We strongly recommend you first have a look at the reasons why the AOL mail may fail to work on your iPhone before you directly jump on to the solutions. As sometimes, there can be a minor issue with your mobile due to why the email account fails to work. So, here are the reasons why the AOL Email is not working on iPhone.

  1. Weak Internet Connection: When the internet speed is slow, then automatically the AOL Email will not be able to work properly.
  2. AOL email app is Outdated: AOL mail app is updated from time to time to provide the best user experience. Although, when the users are not often updating the downloaded applications and the iOS to the latest version, then their iPhone will not be able to meet the minimum requirements of using an application or software which will cause the application to work slowly.
  3. Entering Wrong Login Details: Sometimes, when you are trying to use open the application in a hurry, then there are chances that the users may enter the wrong password in the insert box. So, we suggest entering the password very carefully and double-checking it before proceeding further.
  4. Internet Backend Issues: Sometimes, there can be an issue with your internet connection due to technical glitches. So, if the server will be down from the backend side, then you will not be able to do anything. You have to wait till the issue gets resolved automatically. The same scenario can also be vice-versed at the side of an email application.
  5. Using an outdated version of iOS: When the iOS version in your iPhone has not been updated for a long time. Then it can automatically slow down the operation speed and the way it performs.

How to Solve AOL Email not Working on iPhone

So, once you are cleared with all the possible reasons why the iPhone users may fail to use the AOL email. Then let’s have a look at the methods and process to get the error resolved.

1. Force stop and launch the application again: Sometimes, when you are running multiple background applications in the background, then it can slow down your phone and the internet speed as well. So, close all the running applications and launch the AOL email application again.

  • First, double press the Home button.
  • Now, you will see all the background running applications.
  • Then swipe up on the images of the applications from that list.
  • At last, run the application again and try to perform the same task again through which initially you faced the error.

2. Re-check your login credentials: When you have entered the wrong login details while logging into the email account, then you will not be able to use your AOL email on your iPhone. So, before you submit the AOL mail login credentials, kindly re-check the login credentials and make sure that you have properly ensured the working of caps and Num key.

3. Reinstall the AOL email application: If you are still not able to use the AOL email on your iPhone, then try to consider the old method of deleting and reinstalling the application again. When you are using an application excessively, then your phone automatically stores the data that can’t be erased anywhere else. By uninstalling the application, you can permanently delete the additional stored data and cache for the application.

So, to do so, go to the App Library and tap and choose the AOL Email application and select the “Remove App” option. This will delete the application from your mobile phone. Now, install the application again from the app store and use your login credentials to log back into your account.

4. Reset Multiple Email Accounts: Sometimes, when you are using multiple email accounts, then the AOL email fails to work. So, resetting the multiple email accounts can easily fix the issues that you’re having with the AOL mail application. It might be difficult to reset the multiple email accounts one by one. So, to reset all the accounts at the same time, then go to the Settings and scroll down until you see AOL. Then tap on the AOL and select the “Reset All Accounts” option. Once you tap on the option, it will then reset all your AOL email accounts within the application and after that, you have to sign in again to each account.

5. Updating AOL Email Application: Sometimes, the old method of updating the application to the latest available version works in today’s time as well. So, the process of updating the AOL email application in your iPhone to the latest version is as follows.

  • First of all, go to the iOS App Store on your iPhone mobile.
  • Then type “AOL Mail” in the insert box and search for the application page.
  • Once you open the application page, then click on the “Update” option. In case, if you don’t find the option, it means that your AOL mail application is already updated to the latest version.
  • Click on the “update” option and then the updating process will start automatically.

Once the application is updated, then launch the AOL mail again and try to send a sample mail. At this stage, after following all the above-mentioned steps, the AOL Email not working on iPhone will be resolved.

Read Also: How to Fix Comcast Email Is Not Working on iPhone

Wrap Up

We have mentioned all the possible steps that you can follow to solve the AOL Email not working on iPhone. If you have any specific queries, then feel free to reach out to us through the help section. Our experienced professionals will be happy to solve our query.